USER GUIDE: CROPPING MULTIGROUPS IN AVID
This user guide teaches Assistant Editors how crop and reframe multi-camera groups in Avid Media Composer.
Some versions of Avid contain a bug that causes multigroups to display the wrong cropping. This guide explains how to work around the bug. Follow the guide’s steps to achieve the following results:
- Crop master clips to a new aspect ratio that stays in place throughout the edit process
- Display correct cropping on multigroups in the source monitor
- Display correct cropping on grouped clips in the program monitor
Crop Your Master Clips
Follow the steps below to crop your master clips before multigrouping.
-
Open the bins containing the footage to multigroup. Navigate to the A-Camera master clips.
-
Highlight and right-click the A-Camera master clips.
-
Select Source Settings in the dropdown menu to open the Source Settings pop-up box.
-
Click the FrameFlex tab in the Source Settings pop-up box.
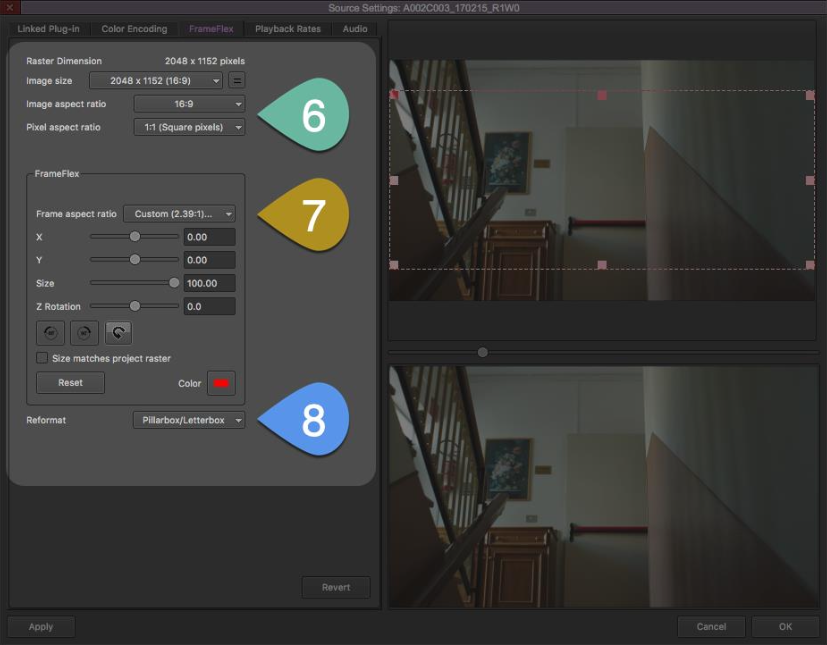
Fig. 1: Avid FrameFlex Settings -
Set the Image Aspect Ratio to 16:9. Set the Pixel Aspect Ratio to 1:1 (Square Pixels).
See the GREEN POINTER in Fig. 1 for these settings.
-
Set your desired Frame Aspect Ratio in the Frame Aspect Ratio dropdown menu.
See the ORANGE POINTER in Fig. 1 for this setting.
-
Select Pillarbox/Letterbox in the Reformat dropdown menu.
See the BLUE POINTER in Fig. 1 for this setting.
-
Click Apply to All at the bottom of the Source Settings pop-up box. This action conforms all A-Camera clips to the new aspect ratio.
-
Navigate to the X and Y position sliders in the FrameFlex box. You can find the sliders next to the ORANGE POINTER in Fig. 1.
-
Use the X and Y sliders to adjust the shot’s framing.
NOTE: You MUST adjust the framing of every single clip to ensure correct display in the final multigroup. This step prevents the Avid bug described in the introduction.
Some shots may not need visible reframing. In these cases, enter “0.01” in a number box to the right of the X or Y slider. This step adjusts framing by a single pixel while avoiding any visible reframing.
-
Click Apply at the bottom of the Source Settings box. The next A-Camera clip appears in the box.
-
Use the X and Y sliders to adjust the shot’s framing, then click Apply. Repeat this process with all remaining A-Camera clips.
-
Click OK to exit the pop-up box after adjusting the final A-Camera clip.
-
Repeat Steps 2–13 with the B-Camera master clips and any additional camera clips, if applicable.
-
Run your multigrouping process on the footage.
NOTE: I strongly recommend Group It For Me for Avid multigrouping.
Visit Group It For Me’s Website for more information.
Format Your Multigroups
Format and finish your cropped multigroups with the steps below.
-
Open your multigroup in the source monitor. The footage may appear stretched or distorted. Hold off on fixing this issue for now.
-
Scrub through your multigroup. Check for any errors and out-of-sync clips.
-
Highlight all the SUBCLIPS (not master clips) in your multigroup bin. Sort your bin by clip type to access all the subclips at once.
-
Right click the subclips. Select Source Settings in the dropdown menu to open the Source Settings pop-up box.
-
Click the FrameFlex tab in the Source Settings pop-up box.
-
Select Pillarbox/Letterbox in the Reformat dropdown menu.
See the BLUE POINTER in Fig. 1 for this setting.
-
Click Apply to All at the bottom of the Source Settings pop-up box. This step conforms the subclips to the correct dimensions and aspect ratio.
-
Click OK to exit the pop-up box.
-
Scrub through your multigroup again. Ensure that the whole multigroup displays the correct dimensions and aspect ratio. If any clip remains stretched or distorted, match back to that clip from the multigroup, then open the clip in the Source Settings box to troubleshoot.
-
Splice a clip from your multigroup into a blank sequence. Check the clip in the program monitor to ensure it displays the correct dimensions and aspect ratio.